去年阿里云搞活动的时候 99/年(续费不涨价)购买了一台 2 核 2G 的 ECS 一直空放着没有使用, 最近收到短信提示要到期了。就想着用来干点啥,工作中习惯了使用 K8s 管理业务,就先考虑部署一套 k3s 环境,具体用来做什么后面再说 -_-\
初始化操作系统
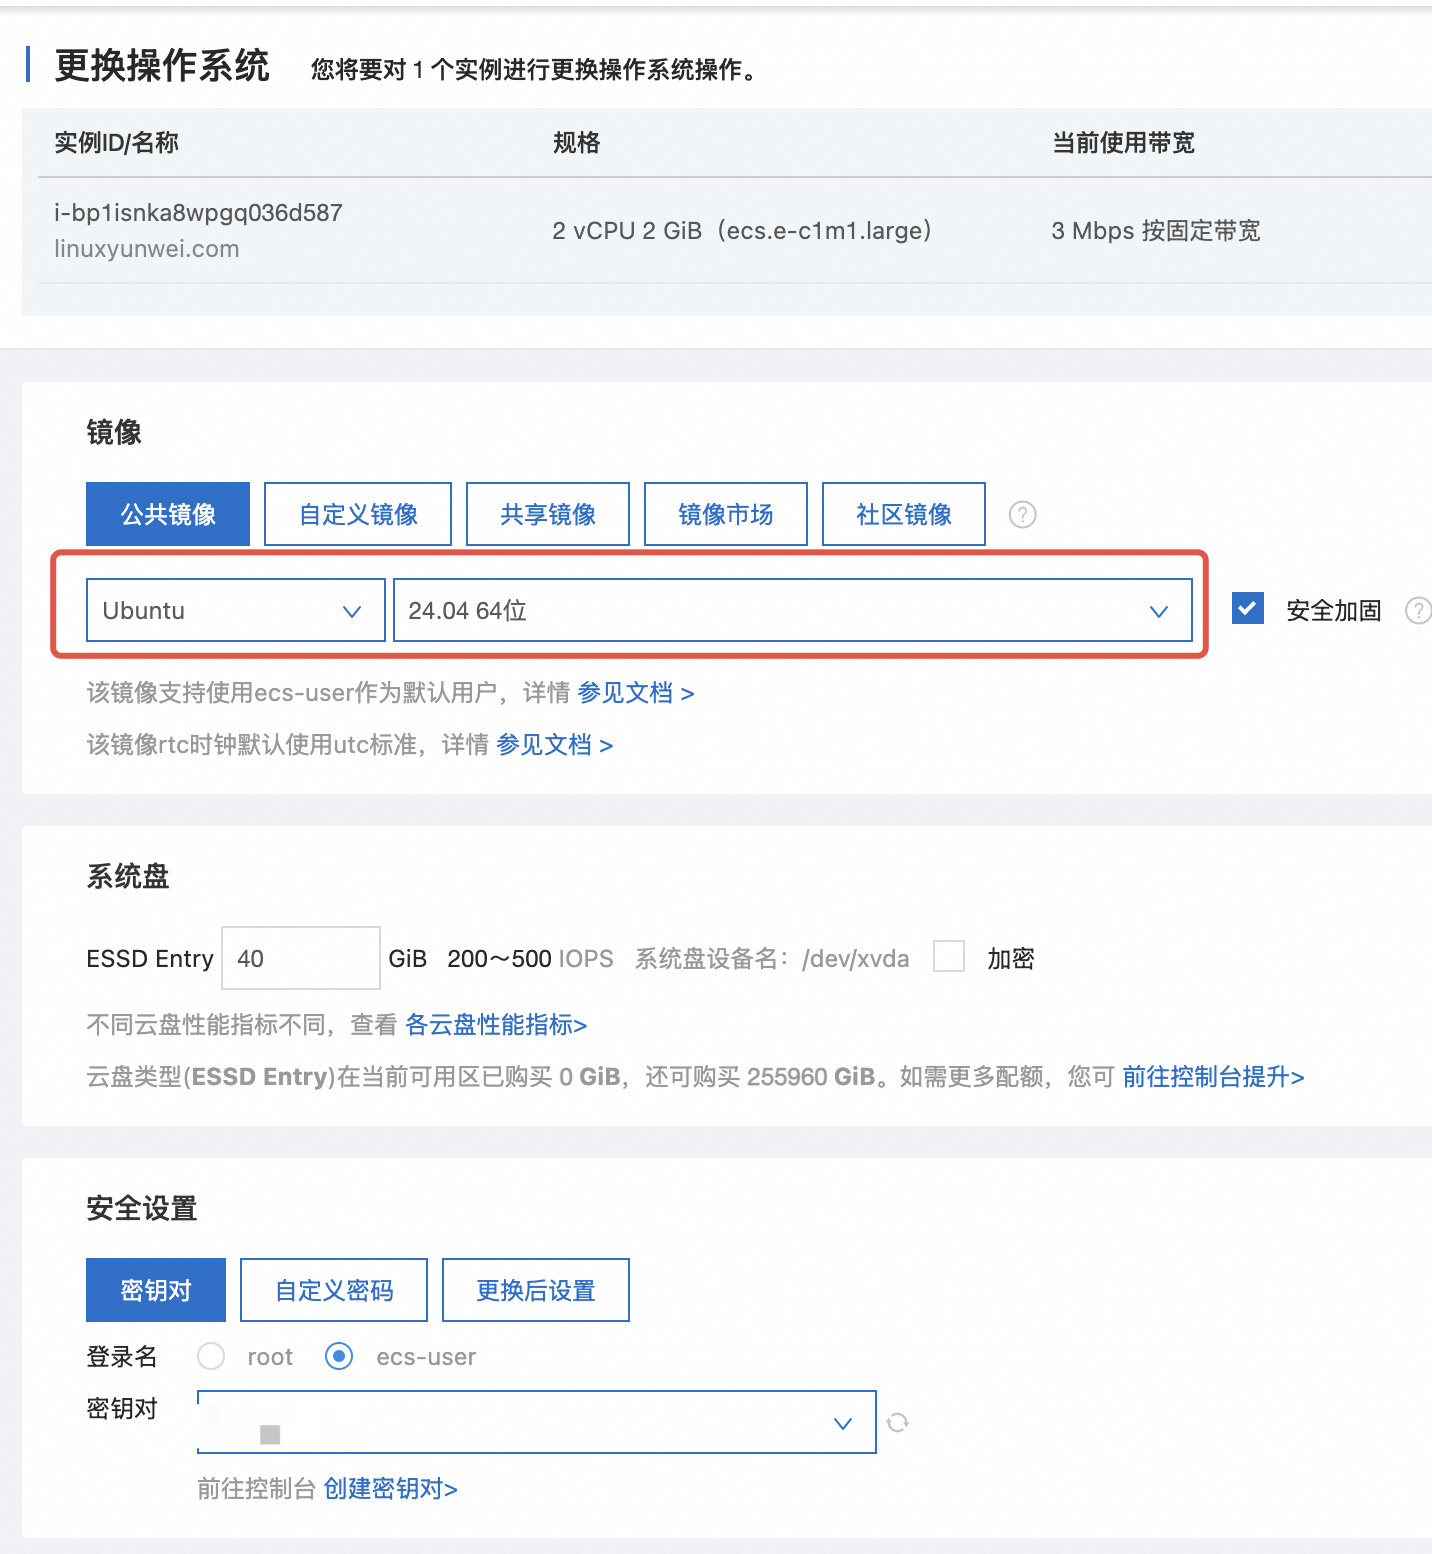
登录到阿里云 ECS 控制台,找到需要配置的 ECS, 选择 全部操作 -> 云盘与镜像 -> 更换操作系统进行更换操作系统
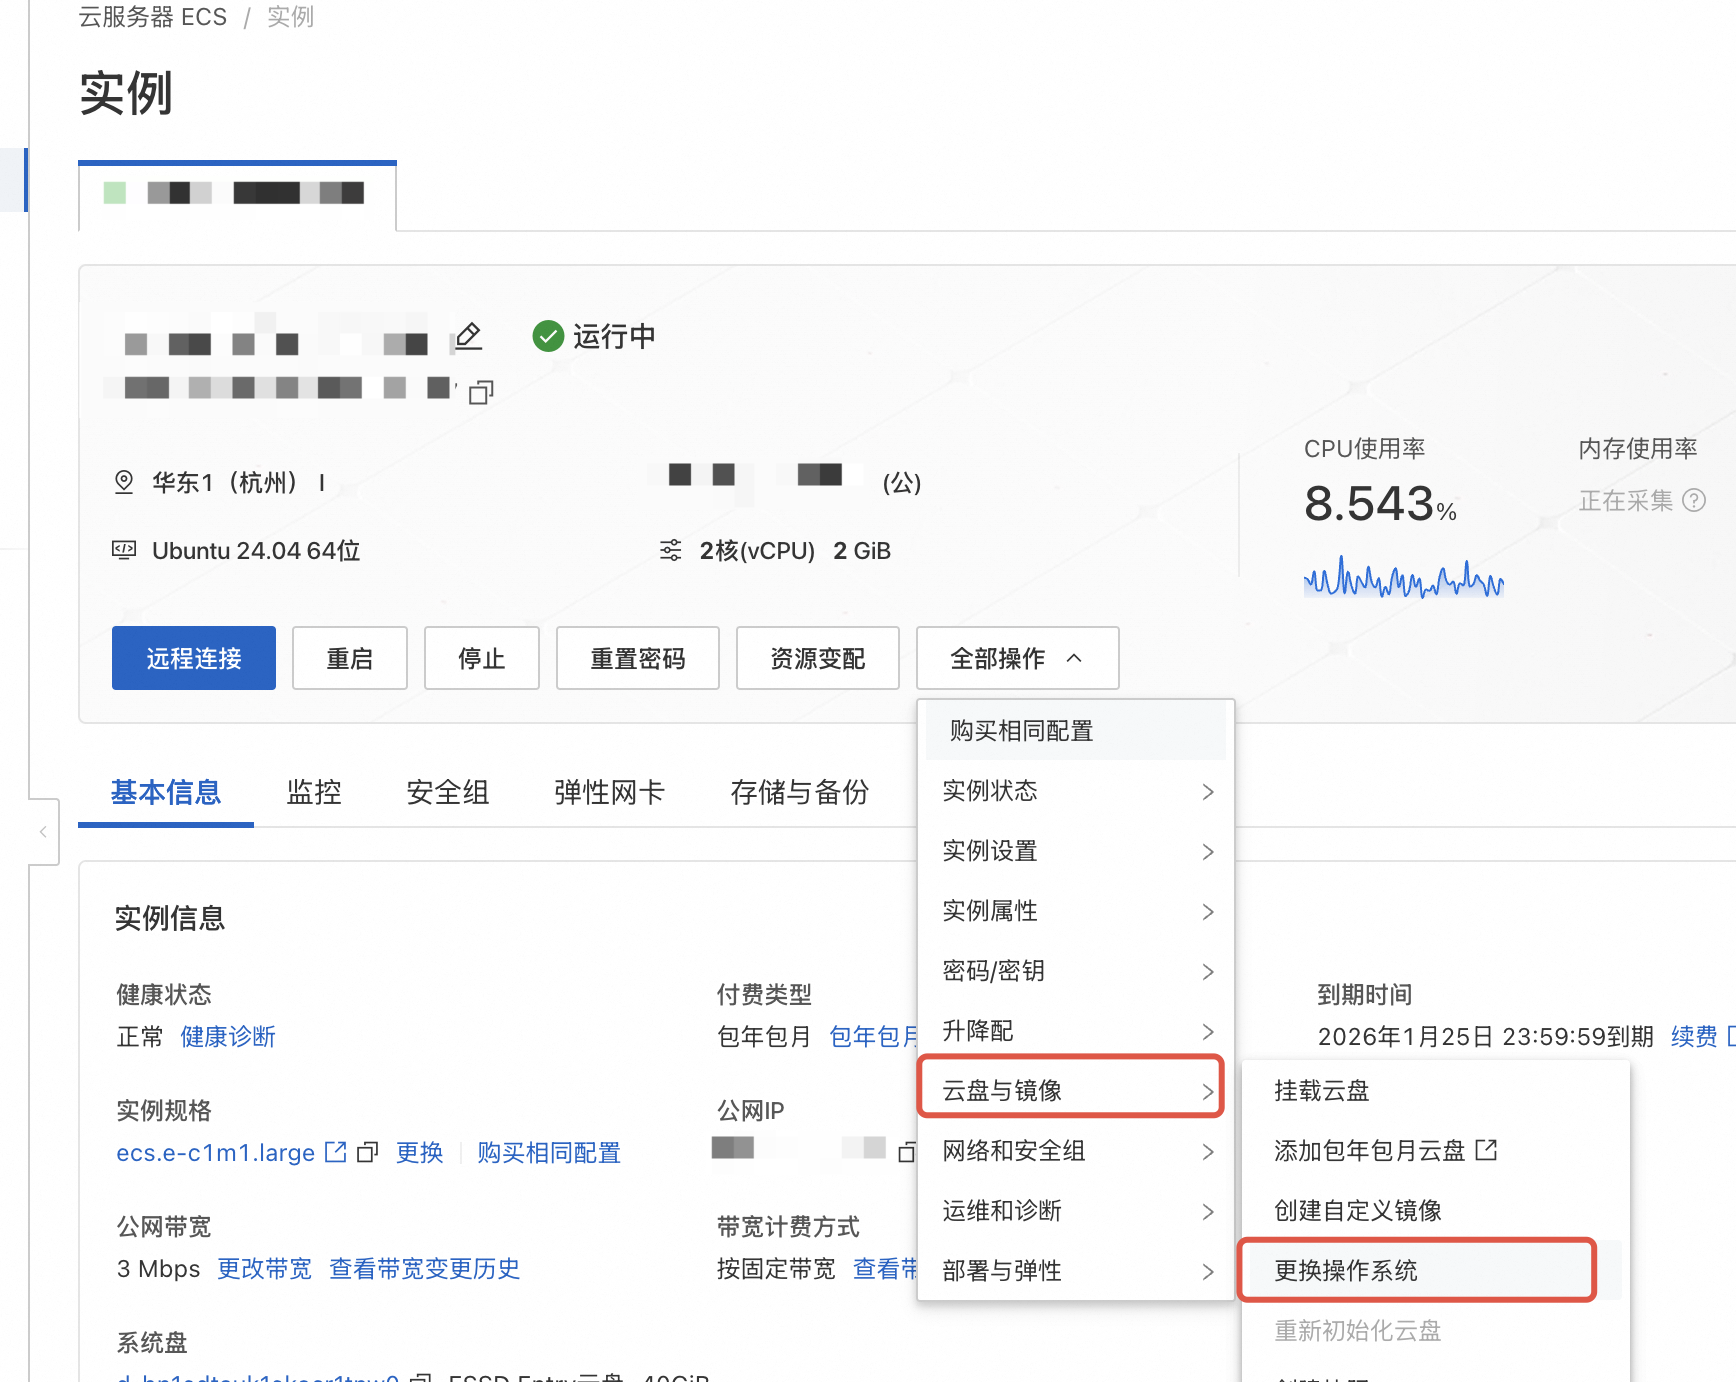
由于我的 ECS 还处于运行中的状态, 这里需要先关机
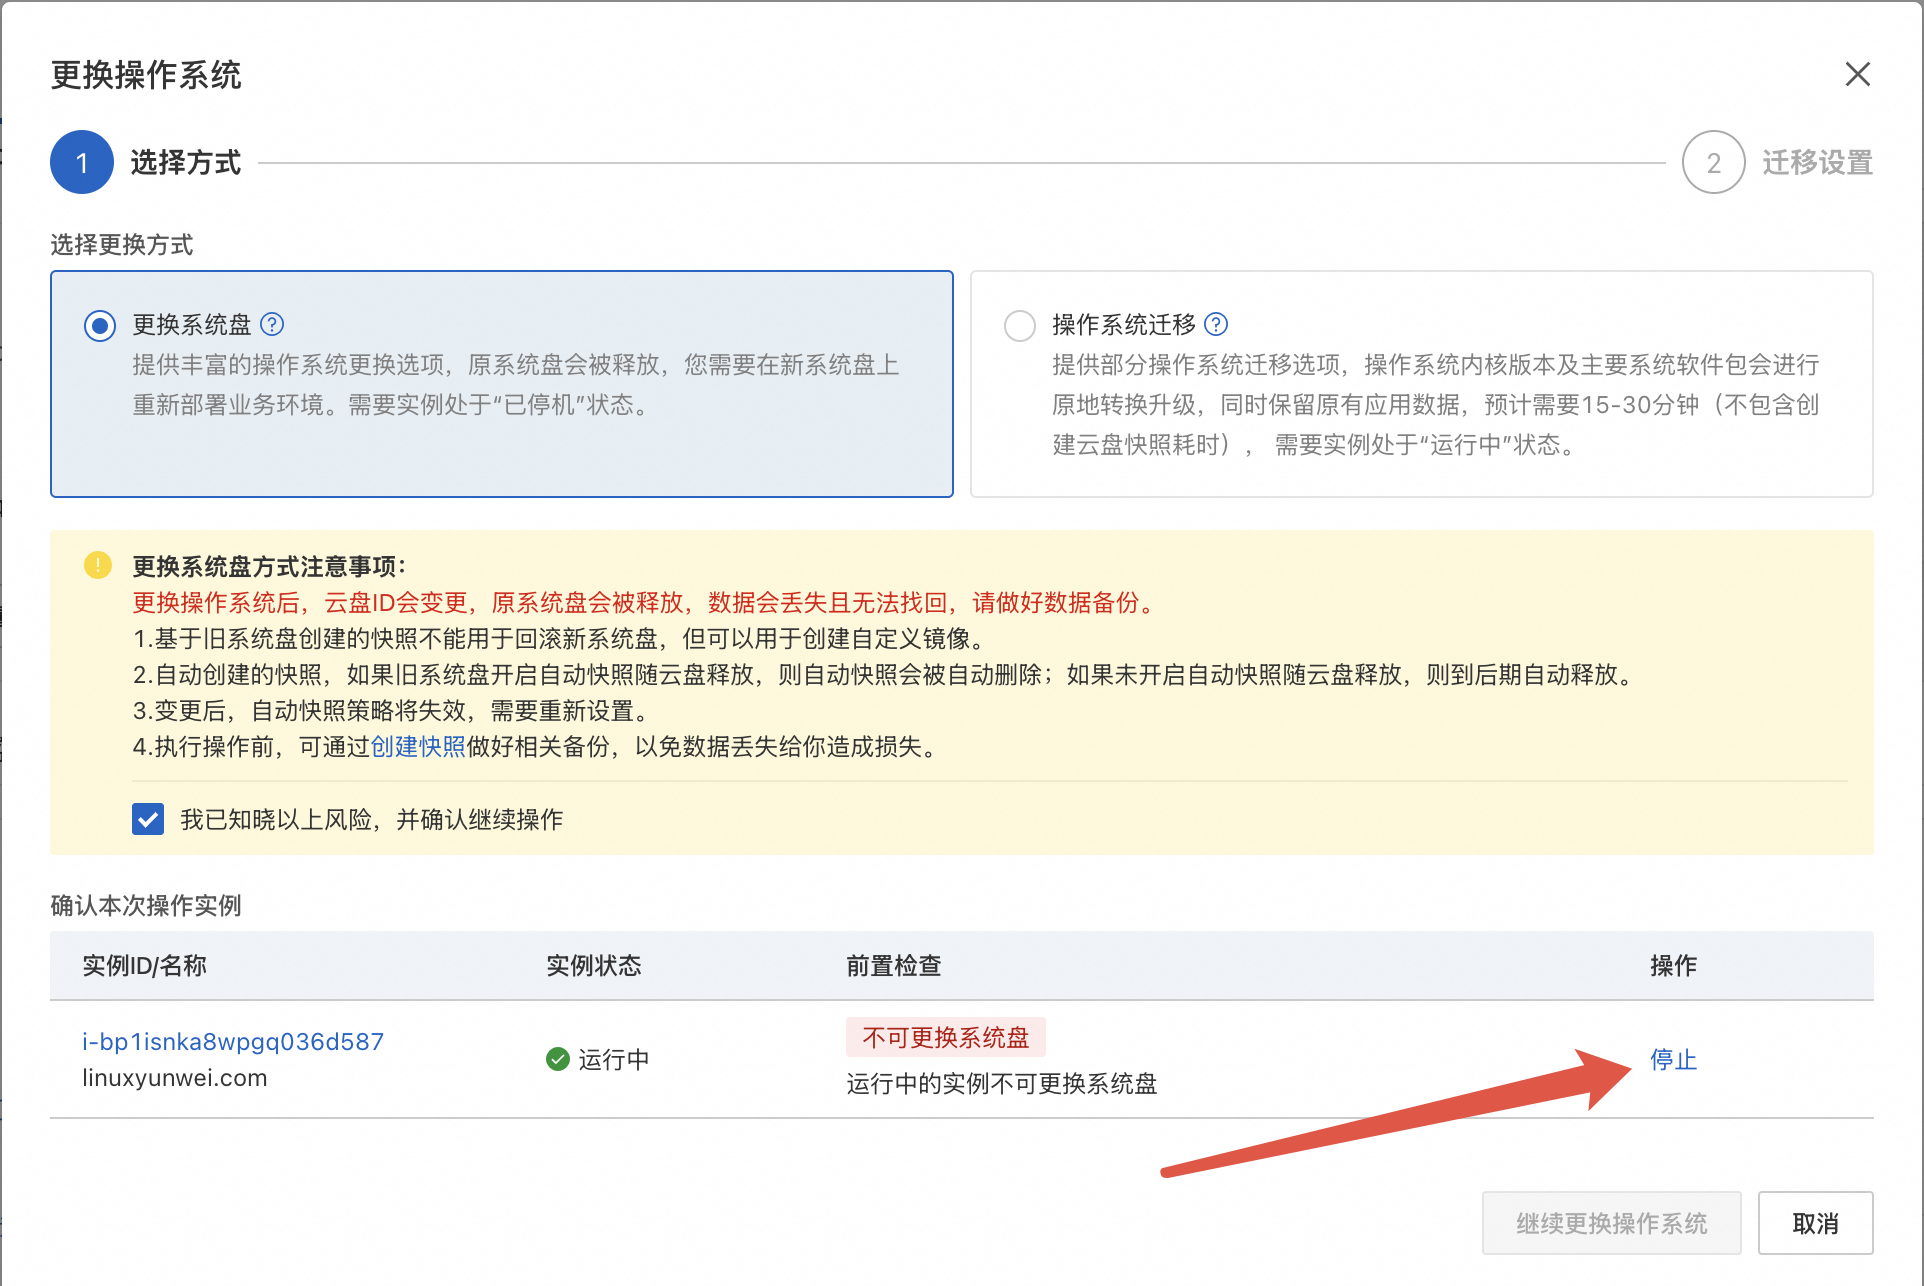
停止方式默认选 停止就行了。
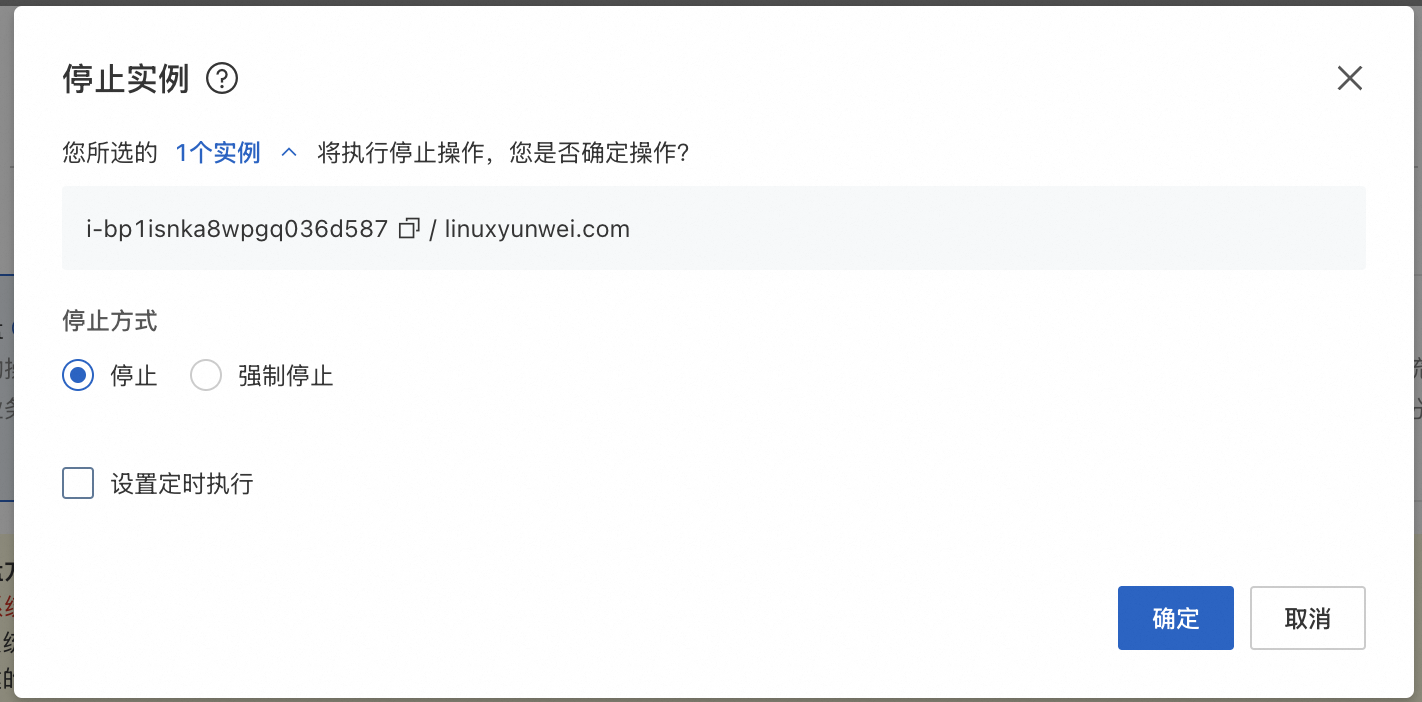
待 ECS 关机之后 , 选择继续更换操作
选好发行版之后点击下方的 确认订单, 这里我选择了 Ubuntu 24.04
部署 k3s
官网安装脚本地址是 https://get.k3s.io , 在大陆地区可以使用 https://rancher-mirror.rancher.cn/k3s/k3s-install.sh 代替
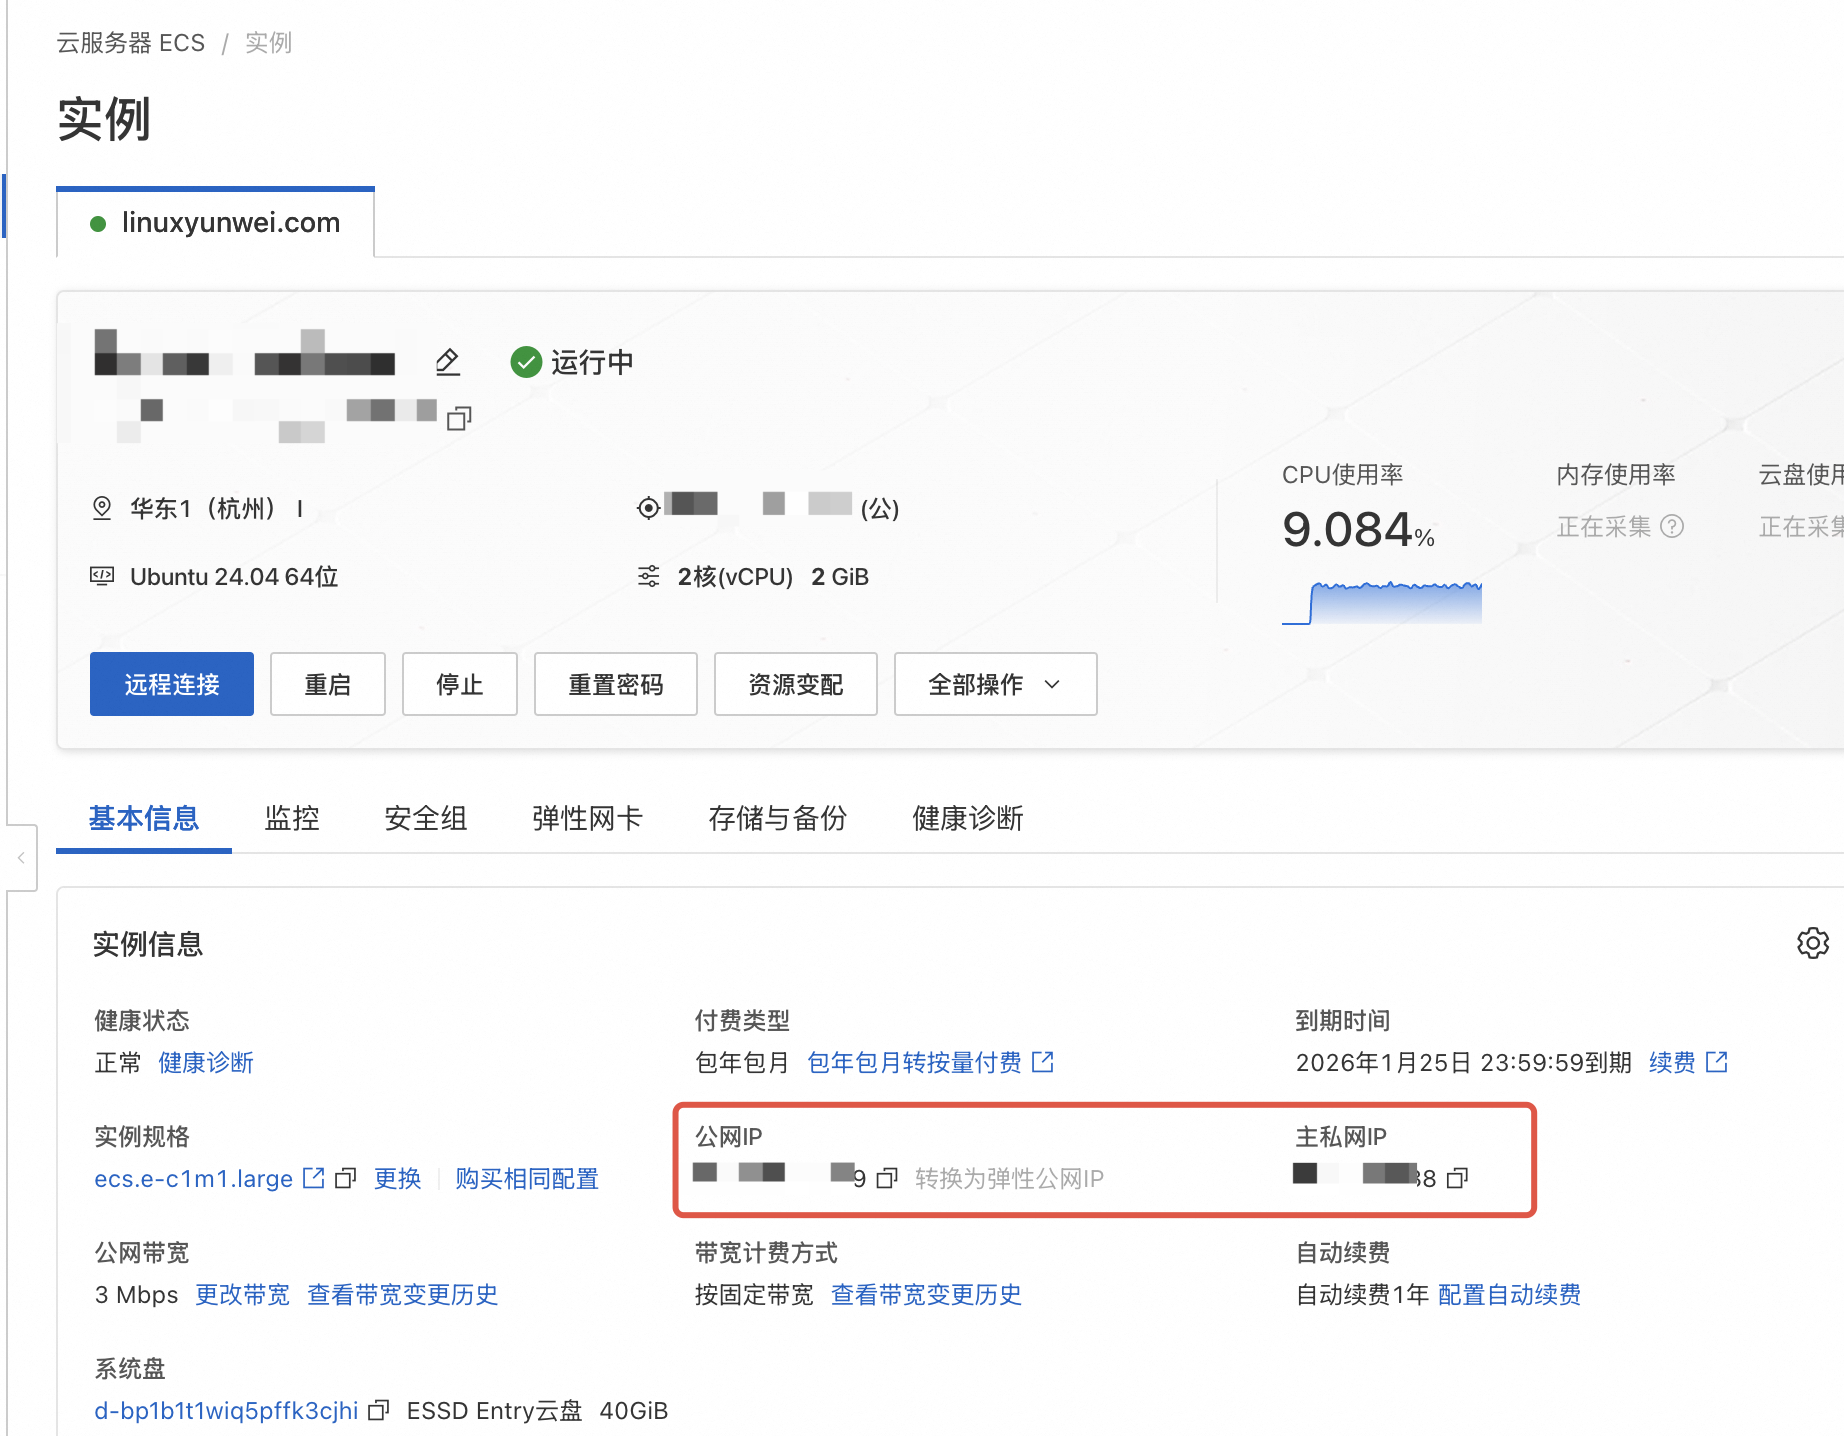
找到 ECS 的公网及私网 IP,后面会用到
通过终端工具 SSH 登录到服务器上安装 k3s
这里所有的操作均基于
root用户身份执行,如果更换操作系统时安全设置里的登录名选择的是ecs-user, 这里可以先使用sudo -i命令切换到root
$ sudo -i ## 切换到 root 用户环境
$ export PUBLIC_IP=<Your ECS Public IP>  ## 公网IP
$ export PRIVATE_IP=<Your ECS Private IP>   ## 私网IP
$ export REGISTRY_MIRROR=dockerproxy.net
$ curl -sfL https://rancher-mirror.rancher.cn/k3s/k3s-install.sh | INSTALL_K3S_MIRROR=cn sh -s - \
  --disable-network-policy \
  --disable-helm-controller \
  --disable=traefik \
  --node-external-ip=${PUBLIC_IP} \
  --node-ip=${PRIVATE_IP} \
  --system-default-registry=${REGISTRY_MIRROR}
[INFO]  Finding release for channel stable
[INFO]  Using v1.31.4+k3s1 as release
[INFO]  Downloading hash rancher-mirror.rancher.cn/k3s/v1.31.4-k3s1/sha256sum-amd64.txt
[INFO]  Downloading binary rancher-mirror.rancher.cn/k3s/v1.31.4-k3s1/k3s
[INFO]  Verifying binary download
[INFO]  Installing k3s to /usr/local/bin/k3s
[INFO]  Skipping installation of SELinux RPM
[INFO]  Creating /usr/local/bin/kubectl symlink to k3s
[INFO]  Creating /usr/local/bin/crictl symlink to k3s
[INFO]  Creating /usr/local/bin/ctr symlink to k3s
[INFO]  Creating killall script /usr/local/bin/k3s-killall.sh
[INFO]  Creating uninstall script /usr/local/bin/k3s-uninstall.sh
[INFO]  env: Creating environment file /etc/systemd/system/k3s.service.env
[INFO]  systemd: Creating service file /etc/systemd/system/k3s.service
[INFO]  systemd: Enabling k3s unit
Created symlink /etc/systemd/system/multi-user.target.wants/k3s.service → /etc/systemd/system/k3s.service.
[INFO]  systemd: Starting k3s
参数说明:
- –disable-network-policy: 禁用网络策略,单机环境不需要开启
- –disable-helm-controller: 禁用自带的 helm 控制器, 服务都是需要外部工具部署的,暂时用不上
- –disable=traefik: 禁用默认的 traefik 网关,可以多次指定需要禁用的组件,如
coredns,metrics-server,local-storage,servicelb。个人不习惯使用traefik所以先禁用,后面使用 higress来代替 - –node-external-ip: 指定 ECS 的公网 IP
- –node-ip: 指定 ECS 的内网(VPC)IP
- –system-default-registry: 默认情况下所有未指定仓库地址的镜像都是从 dockerhub 官方仓库拉取的,在国内环境或部分企业内网可能会无法正常访问到,可以通过这个参数指定代理仓库地址
查看集群运行状态
$ kubectl get pods -A
NAMESPACE     NAME                                      READY   STATUS    RESTARTS   AGE
kube-system   coredns-6d4d797fc6-r2wcz                  1/1     Running   0          3m33s
kube-system   local-path-provisioner-749cdf74fc-vj9z5   1/1     Running   0          3m33s
kube-system   metrics-server-568d68f85d-s5q4k           1/1     Running   0          3m33s
部署 Higress 网关
Higress 的部署方式可以参考官网的 hgctl 工具使用说明 和 使用 Helm 进行云原生部署
我这里使用 kustomize + helm 结合的方式来管理部署
## 创建目录用于存储配置文件
$ mkdir higress && cd higress

## 安装helm
$ snap install helm --classic
2025-01-18T19:01:04+08:00 INFO Waiting for automatic snapd restart...
helm 3.16.4 from Snapcrafters✪ installed
$ helm version
version.BuildInfo{Version:"v3.16.4", GitCommit:"7877b45b63f95635153b29a42c0c2f4273ec45ca", GitTreeState:"clean", GoVersion:"go1.22.7"}

## 添加 higress chart 仓库
$ helm repo add higress.io https://higress.io/helm-charts
"higress.io" has been added to your repositories
$ helm search repo higress.io/
NAME                            CHART VERSION   APP VERSION     DESCRIPTION
higress.io/higress              2.0.6           2.0.6           Helm chart for deploying Higress gateways
higress.io/higress-console      2.0.2           2.0.2           Management console for Higress
higress.io/higress-core         2.0.6           2.0.6           Helm chart for deploying higress gateways
...

## 生成默认 values.yaml 文件
$ helm show values higress.io/higress-core | tee values.yaml
注意,我这里使用的是 higress.io/higress-core, 是因为 higress.io/higress 包含了 core 和 console(UI) 这两部分,我这里暂时用不着 console
修改完成后的 values.yaml 文件内容如下:
global:
  ingressClass: higress
  watchNamespace: ''
  disableAlpnH2: true
  enableStatus: true
  # whether to use autoscaling/v2 template for HPA settings
  # for internal usage only, not to be configured by users.
  autoscalingv2API: true
  enableIstioAPI: true
  enableGatewayAPI: false
  namespace: higress-system

meshConfig:
  enablePrometheusMerge: true
  rootNamespace: ''
  trustDomain: cluster.local
gateway:
  replicas: 1 ## ECS配置较低,我这里改成了1个pod,建议最少保持2个
  metrics:
    enabled: false
  service:
    externalTrafficPolicy: Local
  resources:
    requests:
      cpu: 10m
      memory: 64Mi
controller:
  replicas: 1
  ## 以下为开启 let's encrypt 自动签发域名SSL证书功能
  automaticHttps:
    enabled: true
    email: <Your Email> ## 这里填自己的邮箱
  resources:
    requests:
      cpu: 10m
      memory: 64Mi
pilot:
  replicaCount: 1
  resources:
    requests:
      cpu: 10m
      memory: 64Mi
定义创建名为 higress-system 的命名空间, 文件名 namespace.yaml
## file: namespace.yaml
apiVersion: v1
kind: Namespace
metadata:
  name: higress-system
创建 kustomize 的配置文件 kustomization.yaml, 内容如下:
# file: kustomization.yaml
apiVersion: kustomize.config.k8s.io/v1beta1
kind: Kustomization

resources:
  - https://github.com/alibaba/higress/releases/download/v2.0.6/crd.yaml
  - namespace.yaml

## 参考: https://kubectl.docs.kubernetes.io/references/kustomize/builtins/#_helmchartinflationgenerator_
helmCharts:
  - name: higress-core
    repo: https://higress.io/helm-charts
    releaseName: higress
    namespace: higress-system
    version: 2.0.6 ## <<- helm chart version
    valuesFile: values.yaml
最终的目录结构如下:
$ tree -l
.
├── kustomization.yaml
├── namespace.yaml
└── values.yaml
查看渲染后的内容是否符合预期
kubectl kustomize --enable-helm .
确认无误后部署到 k3s 集群
## 注意: 这里因为使用 kustomize 管理了 helmChart, 所以不能直接使用 kubectl apply -k 来部署
$ kubectl kustomize --enable-helm . | kubectl apply -f -
namespace/higress-system created
customresourcedefinition.apiextensions.k8s.io/envoyfilters.networking.istio.io created
customresourcedefinition.apiextensions.k8s.io/http2rpcs.networking.higress.io created
customresourcedefinition.apiextensions.k8s.io/mcpbridges.networking.higress.io created
customresourcedefinition.apiextensions.k8s.io/wasmplugins.extensions.higress.io created
serviceaccount/higress-controller created
serviceaccount/higress-gateway created
role.rbac.authorization.k8s.io/higress-controller created
role.rbac.authorization.k8s.io/higress-gateway created
clusterrole.rbac.authorization.k8s.io/higress-controller-higress-system created
clusterrole.rbac.authorization.k8s.io/higress-gateway-higress-system created
rolebinding.rbac.authorization.k8s.io/higress-controller created
rolebinding.rbac.authorization.k8s.io/higress-gateway created
clusterrolebinding.rbac.authorization.k8s.io/higress-controller-higress-system created
clusterrolebinding.rbac.authorization.k8s.io/higress-gateway-higress-system created
configmap/higress-config created
service/higress-controller created
service/higress-gateway created
deployment.apps/higress-controller created
deployment.apps/higress-gateway created
ingressclass.networking.k8s.io/higress created
envoyfilter.networking.istio.io/higress-gateway-global-custom-response created
这里可能会遇到创建 higress-gateway-global-custom-response 资源报错,错误信息如下,这里因为 CRD 资源还没有部署好,上面的部署命令重新执行一次就好了
error: resource mapping not found for name: "higress-gateway-global-custom-response" namespace: "higress-system" from "STDIN": no matches for kind "EnvoyFilter" in version "networking.istio.io/v1alpha3"
ensure CRDs are installed first
查看部署状态
$ kubectl get pods -A
NAMESPACE        NAME                                      READY   STATUS    RESTARTS   AGE
higress-system   higress-controller-59c96d96c9-chkhz       2/2     Running   0          3m44s
higress-system   higress-gateway-55777cf55d-m9vj2          1/1     Running   0          3m44s
....
kube-system      svclb-higress-gateway-878678d4-r4n6z      2/2     Running   0          3m44s

$ kubectl get -n higress-system svc
NAME                 TYPE           CLUSTER-IP      EXTERNAL-IP     PORT(S)                                                             AGE
higress-controller   ClusterIP      10.43.239.208   <none>          8888/TCP,8889/TCP,15051/TCP,15010/TCP,15012/TCP,443/TCP,15014/TCP   4m45s
higress-gateway      LoadBalancer   10.43.18.51     101.37.18.109   80:31368/TCP,443:31372/TCP                                          4m44s
验证网关
这里部署个 httpbin 验证下网关, 以 istio 中提供的配置为例,因国内环境无法直接拉取到 docker.io 的镜像,所以我们先把 yaml 文件 copy 下来修改下镜像仓库地址,这里替换为阿里云的专属镜像加速器地址,修改后的文件内容如下:
# Copyright Istio Authors
#
#   Licensed under the Apache License, Version 2.0 (the "License");
#   you may not use this file except in compliance with the License.
#   You may obtain a copy of the License at
#
#       http://www.apache.org/licenses/LICENSE-2.0
#
#   Unless required by applicable law or agreed to in writing, software
#   distributed under the License is distributed on an "AS IS" BASIS,
#   WITHOUT WARRANTIES OR CONDITIONS OF ANY KIND, either express or implied.
#   See the License for the specific language governing permissions and
#   limitations under the License.

##################################################################################################
# httpbin service
##################################################################################################
apiVersion: v1
kind: ServiceAccount
metadata:
  name: httpbin
---
apiVersion: v1
kind: Service
metadata:
  name: httpbin
  labels:
    app: httpbin
    service: httpbin
spec:
  ports:
    - name: http
      port: 8000
      targetPort: 8080
  selector:
    app: httpbin
---
apiVersion: apps/v1
kind: Deployment
metadata:
  name: httpbin
spec:
  replicas: 1
  selector:
    matchLabels:
      app: httpbin
      version: v1
  template:
    metadata:
      labels:
        app: httpbin
        version: v1
    spec:
      serviceAccountName: httpbin
      containers:
        ## 这里将 docker.io 替换为 dockerproxy.net
        - image: dockerproxy.net/mccutchen/go-httpbin:v2.15.0
          imagePullPolicy: IfNotPresent
          name: httpbin
          ports:
            - containerPort: 8080
部署 httpbin 到集群
$ kubectl apply -f httpbin.yaml
serviceaccount/httpbin created
service/httpbin created
deployment.apps/httpbin created

$ kubectl get pods
NAME                       READY   STATUS    RESTARTS   AGE
httpbin-5f4ffff868-9m5hn   1/1     Running   0          5s
生成 Ingress 路由配置, 内容如下:
# file: ingress.yaml
apiVersion: networking.k8s.io/v1
kind: Ingress
metadata:
  name: httpbin
spec:
  ingressClassName: higress ## 这里指定使用 higress
  rules:
    - host: httpbin.linuxyunwei.com ## 访问域名
      http:
        paths:
          - backend:
              service:
                name: httpbin
                port:
                  number: 8000
            path: /
            pathType: Prefix
  tls:
    - hosts:
        - httpbin.linuxyunwei.com
注意看上面的 Ingress 中,我们并没有指定 tls 的 secretName , 后面我会通过 higress 的 automaticHttps 功能对接 let’s encrypt 自动签发证书
部署 Ingress 路由到集群
$ kubectl apply -f ingress.yaml
ingress.networking.k8s.io/httpbin created
$ kubectl get ingress
NAME      CLASS    HOSTS                     ADDRESS          PORTS     AGE
httpbin   higress  httpbin.linuxyunwei.com   101.37.18.109    80, 443   4s
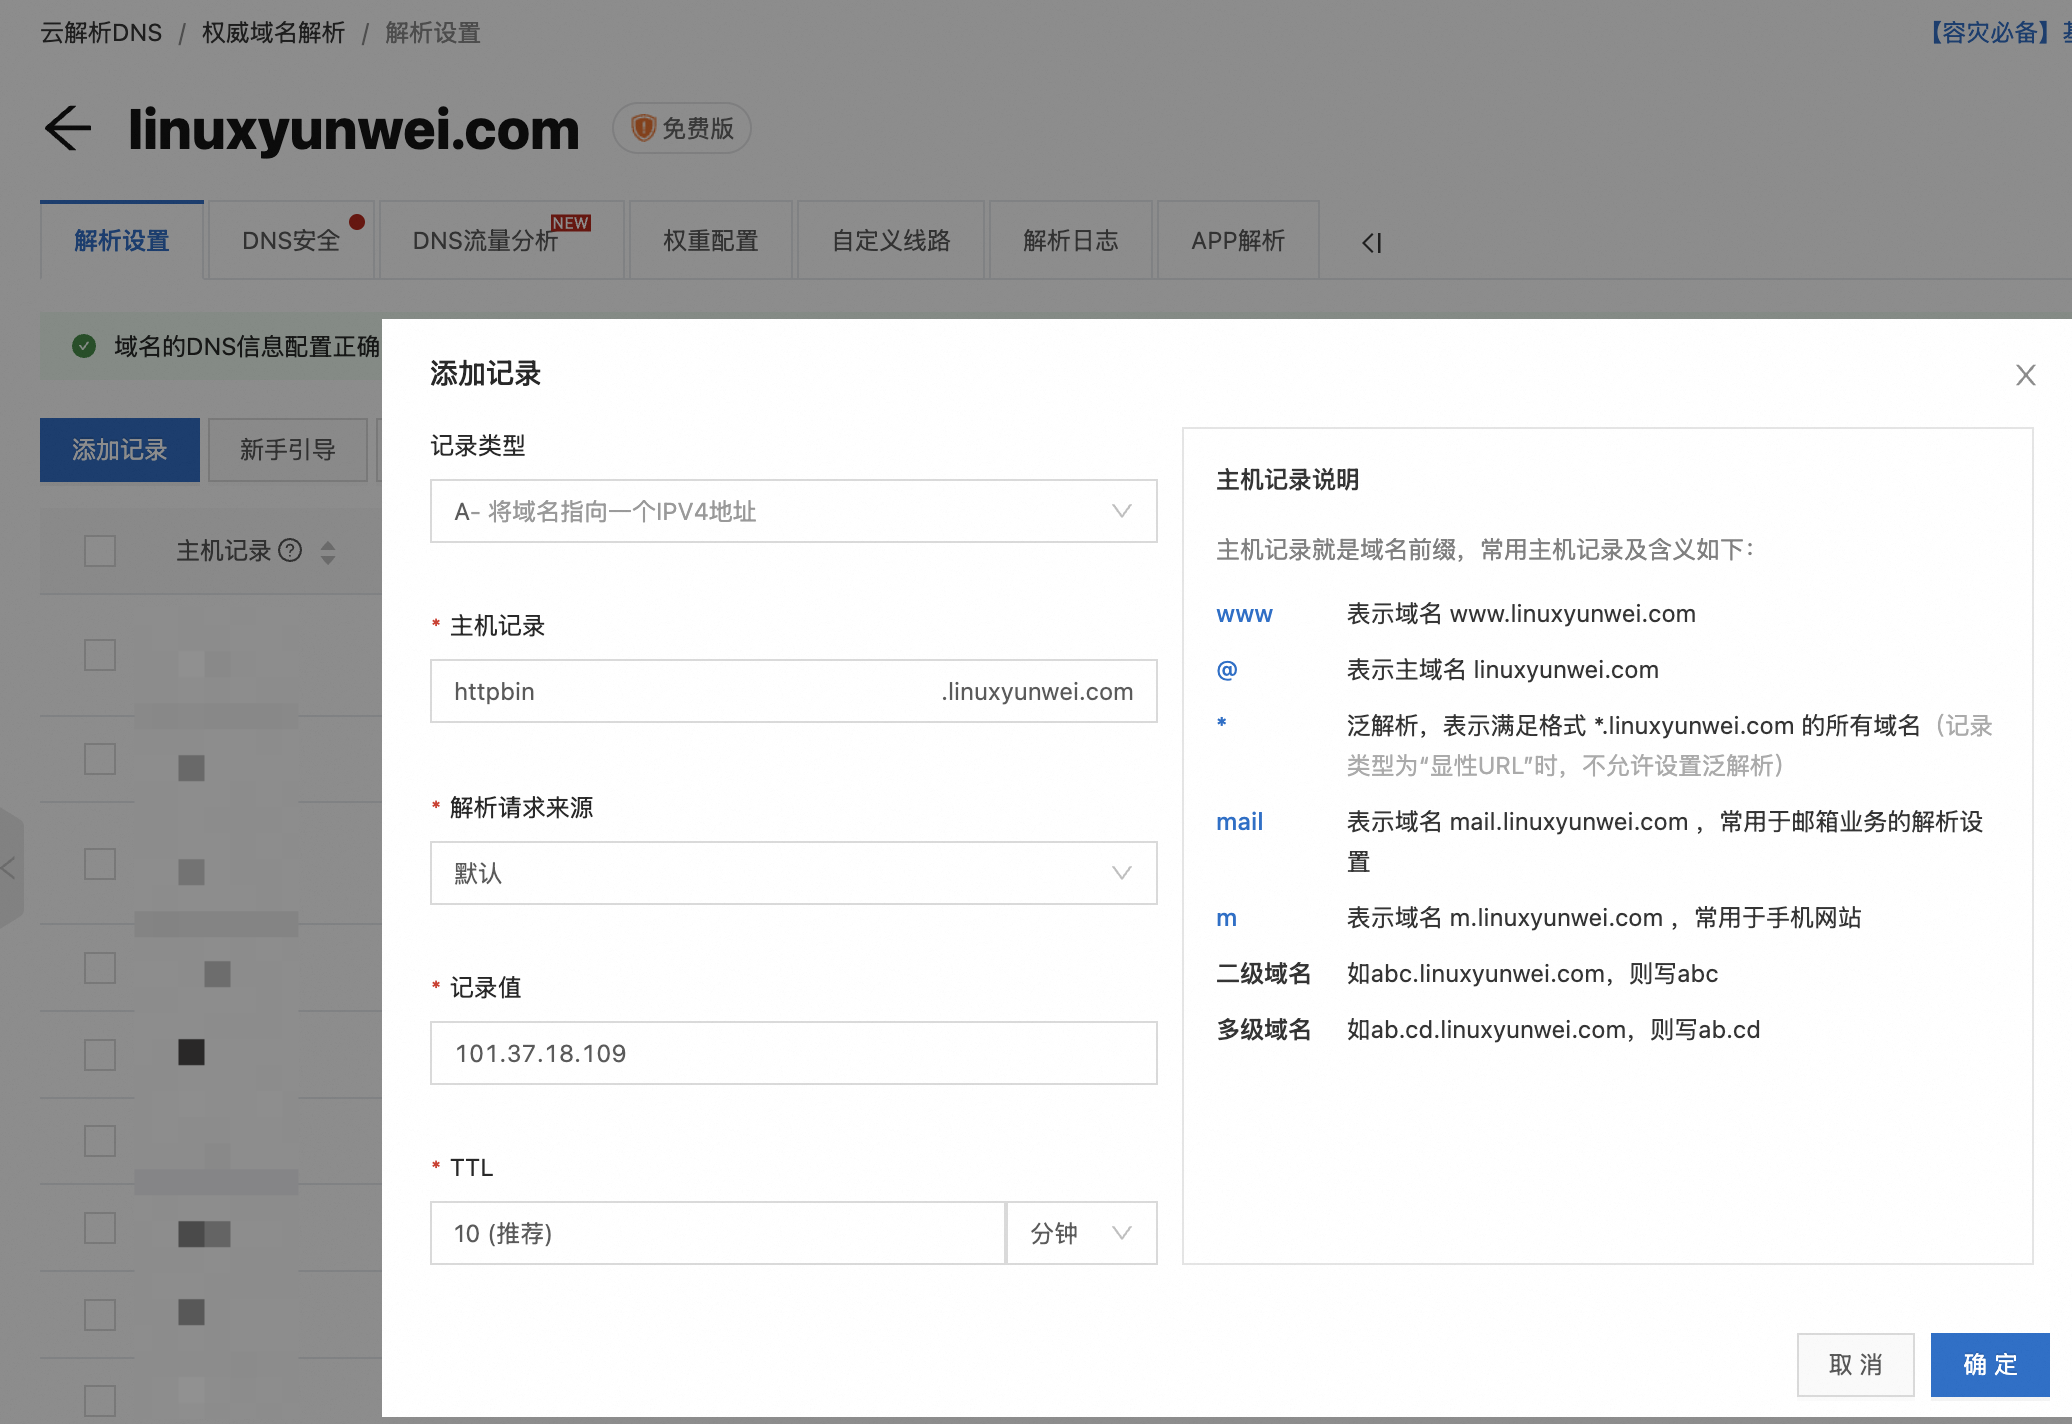
添加 DNS 解析记录,这里以阿里云为例
待 DNS 生效后可以尝试使用 curl 访问
$ nslookup httpbin.linuxyunwei.com
Server:         127.0.0.53
Address:        127.0.0.53#53

Non-authoritative answer:
Name:   httpbin.linuxyunwei.com
Address: 101.37.18.109

## 正常情况会看到如下内容
$ curl http://httpbin.linuxyunwei.com/headers
{
  "headers": {
    "Accept": [
      "*/*"
    ],
    "Host": [
      "httpbin.linuxyunwei.com"
    ],
    "Req-Start-Time": [
      "1737260136218"
    ],
    "User-Agent": [
      "curl/8.5.0"
    ],
    "X-Envoy-Attempt-Count": [
      "1"
    ],
    "X-Envoy-Decorator-Operation": [
      "httpbin.default.svc.cluster.local:8000/*"
    ],
    "X-Envoy-Internal": [
      "true"
    ],
    "X-Envoy-Original-Host": [
      "httpbin.linuxyunwei.com"
    ],
    "X-Envoy-Route-Identifier": [
      "true"
    ],
    "X-Forwarded-For": [
      "10.42.0.1"
    ],
    "X-Forwarded-Proto": [
      "http"
    ],
    "X-Request-Id": [
      "bf98143d-cd47-449b-9e5a-267a91478a5f"
    ]
  }
}
Higress 中开启 TLS 证书自动托管
上一步中创建了 httpbin 服务,并通过 http 协议访问正常,但我们还没有配置 tls 证书,所以如果使用 https 访问会出现问题,如果你已经有了证书, 可以通过配置 Ingress 中 spec.tls.secretName 字段选择已有证书的 Secret。 我这里并没有事先申请证书,就需要由 higress 代劳了。
$ kubectl edit configmap higress-https -n higress-system
apiVersion: v1
data:
  cert: |
    acmeIssuer:
    - ak: ""
      email: daixijun1990@gmail.com
      name: letsencrypt
      sk: ""
    automaticHttps: true
    credentialConfig:
    - domains:
      - httpbin.linuxyunwei.com  ## 添加自己的域名,可以有多个
      tlsSecret: httpbin-linuxyunwei-com-tls  ## 用来存储证书的 secret 名称
      tlsIssuer: letsencrypt    ## 指定使用 let's encrypt
    fallbackForInvalidSecret: true
    renewBeforeDays: 30
    version: "20250118113351"

## 稍等一会之后就可以看到证书已经创建好了
$ kubectl get secret -n higress-system
NAME                          TYPE                DATA   AGE
httpbin-linuxyunwei-com-tls   kubernetes.io/tls   2      6m36s

## 我们现在使用 https 访问下试试
$ curl -v https://httpbin.linuxyunwei.com/status/200
* Host httpbin.linuxyunwei.com:443 was resolved.
* IPv6: (none)
* IPv4: 101.37.18.109
*   Trying 101.37.18.109:443...
* Connected to httpbin.linuxyunwei.com (101.37.18.109) port 443
* ALPN: curl offers h2,http/1.1
* TLSv1.3 (OUT), TLS handshake, Client hello (1):
*  CAfile: /etc/ssl/certs/ca-certificates.crt
*  CApath: /etc/ssl/certs
* TLSv1.3 (IN), TLS handshake, Server hello (2):
* TLSv1.3 (IN), TLS handshake, Encrypted Extensions (8):
* TLSv1.3 (IN), TLS handshake, Certificate (11):
* TLSv1.3 (IN), TLS handshake, CERT verify (15):
* TLSv1.3 (IN), TLS handshake, Finished (20):
* TLSv1.3 (OUT), TLS change cipher, Change cipher spec (1):
* TLSv1.3 (OUT), TLS handshake, Finished (20):
* SSL connection using TLSv1.3 / TLS_AES_256_GCM_SHA384 / X25519 / id-ecPublicKey
* ALPN: server accepted http/1.1
* Server certificate:
*  subject: CN=httpbin.linuxyunwei.com
*  start date: Jan 19 03:30:15 2025 GMT
*  expire date: Apr 19 03:30:14 2025 GMT
*  subjectAltName: host "httpbin.linuxyunwei.com" matched cert's "httpbin.linuxyunwei.com"
*  issuer: C=US; O=Let's Encrypt; CN=E6
*  SSL certificate verify ok.
*   Certificate level 0: Public key type EC/prime256v1 (256/128 Bits/secBits), signed using ecdsa-with-SHA384
*   Certificate level 1: Public key type EC/secp384r1 (384/192 Bits/secBits), signed using sha256WithRSAEncryption
*   Certificate level 2: Public key type RSA (4096/152 Bits/secBits), signed using sha256WithRSAEncryption
* using HTTP/1.x
> GET /status/200 HTTP/1.1
> Host: httpbin.linuxyunwei.com
> User-Agent: curl/8.5.0
> Accept: */*
>
* TLSv1.3 (IN), TLS handshake, Newsession Ticket (4):
* TLSv1.3 (IN), TLS handshake, Newsession Ticket (4):
* old SSL session ID is stale, removing
< HTTP/1.1 200 OK
< access-control-allow-credentials: true
< access-control-allow-origin: *
< content-type: text/plain; charset=utf-8
< date: Sun, 19 Jan 2025 04:37:32 GMT
< content-length: 0
< req-cost-time: 1
< req-arrive-time: 1737261452765
< resp-start-time: 1737261452767
< x-envoy-upstream-service-time: 1
< server: istio-envoy
<
* Connection #0 to host httpbin.linuxyunwei.com left intact
如果证书未能正常申请, 可以通过如下命令查看控制端的日志进行排查
kubectl logs --tail 200 -f -n higress-system -l higress=higress-controller -c discovery